Miniature Palm Trees
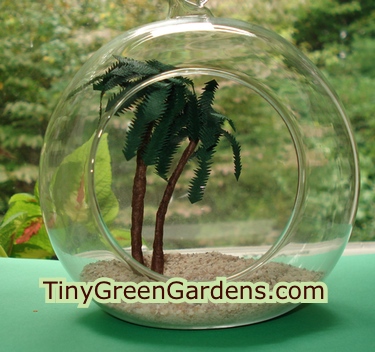 I talked once before about making palm trees but the ones included in the Romantic Aegean Sea Beach House Kit are way cuter. Best of all, I think you can purchase all of the supplies and duplicate them fairly easily.
The miniature palm trees are made with three strands of wire, a bit of paper ribbon stuff and paper. And, lots of patience for cutting out palm fronds with little, itty, bitty teeth.
Some of the other kits in this line don’t make the fronds with the teeth. I have mixed feelings if all of the snipping and cutting is worth it when compared to the straight-edged leaves.
Miniature Palm Trees – the Trunk
The kit calls for making two palm trees. One uses 3 pieces of 9cm length wire, the other 7cm. I’m not sure of the size of the wire the kit came with. It is quite flexible, electrical wire with a single strand of wire coated in black plastic that is about 1mm thick.
 You twist the wires around each other in a spiral fashion. The neater and more even you twist, the smoother your tree trunk will be. The instruction booklet showed one of the wires slightly extended from the twisted bundle. They glue a brown seed beed on the exposed bit to help create a base for the palm fronds. It made for easier glueing to remove a bit of the wire coating to expose the wire and have the bead go on the wire.
The thin raffia ribbon stuff came in two strands. You use one strand and wrap it around the wire bundle to create the miniature palm tree trunk. When you get to the top with the exposed wire, be sure to leave that bit of wire uncovered. Also, there’s a sweet little umbrella in the kit that uses the raffia – don’t forget like I almost did, otherwise you won’t have enough.
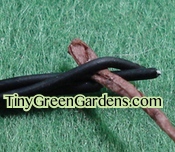 I started wrapping the raffia around the palm tree trunk by securing the end in between the twist of the wires. I thought that would make everything a bit more secure and help to make the bottom of the trunk a little wider. I also used glue to secure it in place and here and there as I was wrapping the raffia around the wire.
 Here’s what it looks like. It’s a grey day here, so the color’s a bit off but it shows how the wrap looks. Notice the brown seed bead at the top. I learned the hard way that you should wait until the glue dries on the bead before trying to attach the palm fronds.
Miniature Palm Trees – The Fronds
The instruction booklet for the Aegean Sea Beach House Kit came with patterns for three different sized palm fronds. Consider, one wrong snip and you lose your pattern piece. I photocopied that page and made my pattern pieces from the copy.
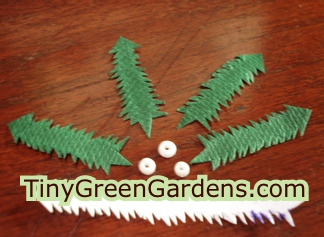 I am so glad I tried this with plain paper first. I tried a number of scissors before opting to use my trusty wire cutters to cut the tips of the fronds. I have much more control nipping away at the edges than cutting them. I included 3 seed beads in the photo to give you an idea of how tiny these cuts are – the smaller leaves are only 2cm long and the larger one is 4. There was also a 3cm palm frond used to make these.
Attaching the leaves or fronds to my miniature palm tree was a bit of an exercise in patience. I would attach one or two leaves and wait for them to dry. Otherwise, they just simply slid all over or fell off the tree completely.
The leaf pattern had a bit of a pointed arrow tip on one end. Sometimes bending this point backwards on itself would help add a little loft to the way the fronds draped.
If you just glue the fronds down on top of each other they come out sorta flat. I bent, twisted and curled them to show a more upright and flopped over position that palms have in nature. Whatever you do, don’t let your favorite feline lay on your palm trees – trust me, they’ll never be the same.
The two trees get glued onto a small piece of cardboard. The cardboard will help them stand and gets hidden under the sand. I trimmed a bit off the bottom of each tree with my wire cutters to make a flatter base to glue onto the cardboard. I put a big glob of tacky glue down, waited a few minutes and then stuck the tree in. But, I still ended up holding onto each tree to let the glue dry. YMMV.
Making Miniature Palm Trees w/out the Kit
Miniature Palm Tree Trunks
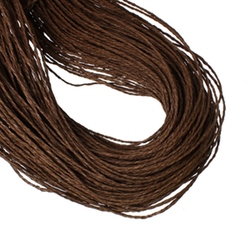 The trees in the product photos for the Aegean Sea Beach House appear to be a bit more textured than mine. It looks like they left the raffia stuff more twisted. There wouldn’t have been enough to make the trees without unraveling the raffia. I would think leaving some raveled and some partially unraveled would have made for a better look.
The stuff that came with the kit looked a lot like paper jewelry cord rope. Seems like a good choice would be Paper Jewelry Cord that comes in a bundle 750m long – you could make miniature palm trees for years with all of that cording.
When I wrote this post, no one had posted a review of the paper jewelry cord. So, you might also want to consider something a little different – hemp beading cord. I’m not sure how flat it will become when unraveled but the folks who have purchased it seemed to like it. It costs a little less than the paper, but it is 205 feet long.
Miniature Palm Tree Leaves
I’m still looking to find a similar sort of paper that came with the kit to make the leaves. It’s just slightly thicker than regular copy paper and has a texture. From a distance, the texture adds a bit of dimension. Close up, I don’t think the texture really adds to the look of the leaves, It’s a bit of a checkerboard design and no matter how I cut the palm fronds, the pattern seemed to be going the wrong way. I would think a nice green construction paper or copy paper would work just as well. If you were feeling ambitious, perhaps painting the leaves would give a nice result too. If I figure out what the paper is or find an alternative, I’ll let you know.
